This tutorial will show you how to set up the Authorize.Net (using sandbox account) payment gateway for FraudLabs Pro testing. Before starting the set up, you will need to have an active Authorize.Net sandbox account. If you do not have it, please sign up for one at https://developer.authorize.net/. We will also assume that you have already installed and activated the FraudLabs Pro fraud prevention module. You may visit https://www.fraudlabspro.com/supported-platforms/whmcs for the installation guidelines.
Steps to setup Authorize.Net payment gateway
- Login to your WHMCS admin area.
- Click on the Setup -> Payments -> Payment Gateways.
- Click on the All Payment Gateways tab. You should see a list of supported payment gateways available.
- Click on the Authorize.net CIM box to activate the module.
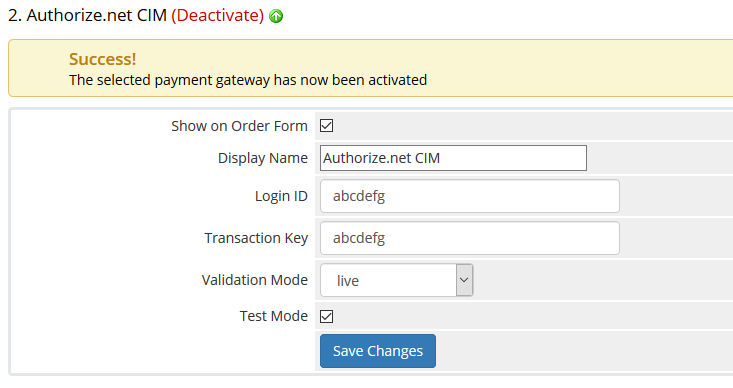
- You should see the below screenshot if the module was successfully activated.

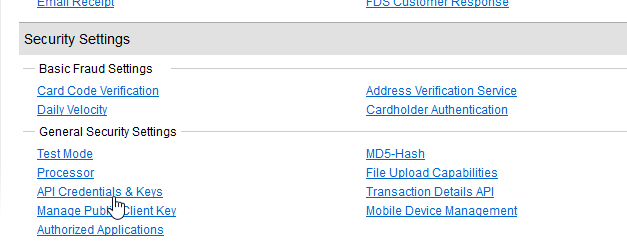
- Enter your Login ID and Transaction Key. You can obtain this information from your Authorize.Net sandbox admin page. It is located under Account -> Security Settings -> API Credentials & Keys.

- Please take note that Transaction Keys will not be displayed on the credential page. It’s only shown during the initial sandbox account registration and it’s assumed that you have safely kept it somewhere. However, you may regenerate the key if you had lost it on the API Credential & Keys page.
- For the Validation Mode, please make sure to set it to Live.
- Enable the Test Mode for the testing purpose.
- Click on the Save Button to save the settings.
You are now ready to run the testing using the Authorize.Net payment gateway. You may visit the following page for the test cards that are supported by Authorize.Net https://developer.authorize.net/hello_world/testing_guide/. Please take note that under the sandbox mode, no actual payment will be transacted. It’s just a simulation to help you understand how the FraudLabs Pro module works with the Authorize.net payment gateway. Once you are satisfied with the test result and ready to go for live, please re-configure your Authorize.Net settings and also don’t forget to uncheck the Test Mode checkbox.